-
Android Okhttp Interceptor로 원하는 응답으로 변형하기와 Interceptor Test안드로이드 2021. 10. 31. 02:13반응형

이 인터셉터 아님 Okhttp 라이브러리 중 Interceptor를 Test 하는 방법에 주관 가득한 생각을 담아 써보려 한다.
Interceptor는 실제 서버 통신이 일어나기 직전, 직후에 요청을 가로채서 무언가 어썸한 작업을 한 후에 다시 원래 흐름으로 돌려놓는 기능을 제공한다.
아래 사진이 직관적으로 이해하기 좋다.

왜 Interceptor를 사용했는가?
Interceptor는 다양한 방법으로 활용할 수 있는데, 필자는 서버 응답을 재가공하기 위해서 사용했다.
사이드 프로젝트에서 사용하는 서버의 응답 Json은 아래와 같은 포맷이다
- 응답이 성공인 경우
{ "status": 200, "success": true, "message": "blar blar", "data": { "key": "value" } }- 응답이 실패인 경우
{
    "status": 400,
    "success": false,
    "message": "blar blar"
}
개인적으로 필자는 이런 포맷을 선호하지 않는다. status code와 message값은 HTTP 응답 자체에서 꺼내 쓸 수 있기 때문이다.
게다가 이 응답을 받아서 사용할 때 코드가 지저분해지는 상황에 놓인다.

벌써부터 끔찍하다... 꺽쇠의 지옥부터 시작해서, 응답 실패일 때는 data가 null일 테니 항상 null일 때 처리 또한 로직을 써주어야 한다. 😨
그리고 github이나 naver 등 open api들을 보면 응답에는 data payload만 담는 것이 일반적이다.
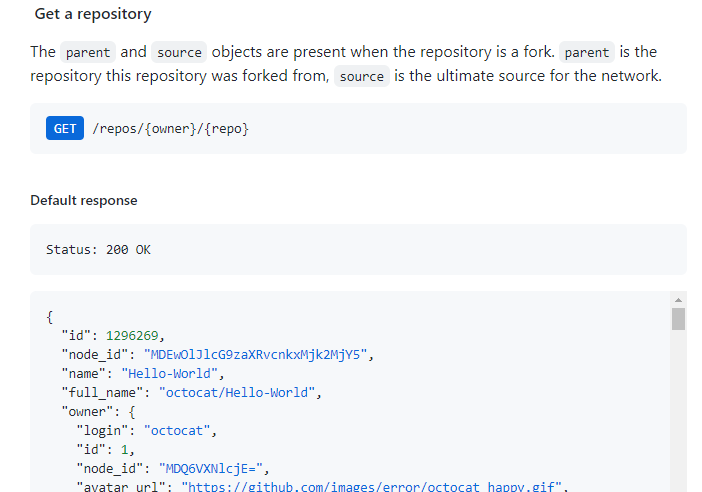
일반적인 Open API의 형태 하지만 사이드 프로젝트를 진행하면서 서로 개발을 진행하는 시간대와 범위가 상이하기도 했고, 내가 View를 만드는 동안 백엔드에서는 응답에 대한 템플릿이 완성되어있는 상황이었다.
이전에 서로 싱크를 맞추지 않았던 잘못이었지만, 백엔드 개발자의 시간 투자가 어려운 관계로 응답 포맷 변경을 요청하지 않았다. 또, 변경하면 iOS도 같이 변경해야 하니 이대로 진행하기로 했다.
Interceptor의 구현
인터셉터의 구현은 그리 어렵지 않다.
{
    "status": 200,
    "success": true,
    "message": "blar blar",
    "data": {
        "key": "value"
    }
}
필자가 원하는 것은 실제로 서버로부터 온 위의 응답이, 아래 응답 포맷이 온 것처럼 Retrofit에게 알려주는 것이다.
{
    "key": "value"
}
가장 처음 해야 할 일은 기존 요청을 가로챘지만 그대로 요청을 다시 보내는 일이다.
변형을 하기 위해서는 원본의 응답이 필요하기 때문이다.
override fun intercept(chain: Interceptor.Chain): Response {
    val response = chain.proceed(chain.request())
	//...
}
그리고 응답에서 json body를 추출해낸다.
서버 요청을 했을 때 nginx가 고장 났거나, 내부적으로 문제가 생겼을 때 html 포맷으로 데이터가 날라온 적도 있기 때문에 아래처럼 Exception처리도 해주었다.
class VinylaResponseUnboxingInterceptor : Interceptor {
    override fun intercept(chain: Interceptor.Chain): Response {
        val response = chain.proceed(chain.request())
        val responseJson = response.extractResponseJson()
		//....
    }

    private fun Response.extractResponseJson(): JSONObject {
        val jsonString = this.body?.string() ?: EMPTY_JSON
        return try {
            JSONObject(jsonString)
        } catch (exception: Exception) {
            Logger.d(
                "VinylaResponseUnboxingInterceptor",
                "서버 응답이 json이 아님 : $jsonString"
            )
            throw UnexpectedServerError(cause = exception)
        }
    }
    //...
}
그다음은 추출한 Json Body에서 "data"에 해당하는 Json만 Object만 꺼내서 새로운 Response 객체를 만들어 반환해주면 끝이다.
message는 이왕 보내준 거 Response에 집어넣었다.
class VinylaResponseUnboxingInterceptor : Interceptor {
    override fun intercept(chain: Interceptor.Chain): Response {
		//...

        val dataPayload = if (responseJson.has(KEY_DATA)) responseJson[KEY_DATA] else EMPTY_JSON
        return response.newBuilder()
            .message(responseJson[KEY_MESSAGE].toString())
            .body(dataPayload.toString().toResponseBody())
            .build()
    }

    companion object {
  	    private const val EMPTY_JSON = "{}"

        private const val KEY_MESSAGE = "message"
        private const val KEY_DATA = "data"
    }
}
이젠 꺽쇠 지옥도, data field의 null 처리 로직도 안녕이다👋👋

깰ㅡ껌쓰
Interceptor Test
그럼 Interceptor를 만들었으니 이제 테스트를 해봐야겠다.
테스트야 뭐, 그냥 바로 서버 요청을 해보면 되지 않나? 왜 굳이 그런 걸 블로그 포스팅을 하는 거지?? 🤷♂️🤷♀️🤷♂️🤷♀️
라고 생각했다면 완전히 경기도 오산이다.
서버 통신 테스트 코드를 작성해야 하는 이유를 대보라면 무수히 많이 나오겠지만, 조금 추려본다면 이렇다.
- API가 건당 요금이 나가는 경우 테스트를 하면 요금이 발생한다
- 서버가 내려가 있거나, 현재 통신이 불가능한 상황인 경우
위 경우에서 서버 통신에 대한 테스트를 수작업으로 할 수 없게 된다. 그렇기 때문에 실제 서버 통신을 하지 않는 테스트 코드 작성은 필수이다.
필자는 Junit5, Truth, mockk를 사용해서 테스트 환경을 만들었다.
Test를 위해 사전 값 설정
interceptor의 intercept 메서드를 테스트하기 위해서는 Interceptor.Chain 객체를 파라미터로 넘겨주어야 한다.
메서드 내에서 chain의 proceed() 메서드의 반환 값인 Response만 있으면 되기 때문에 이 chain객체를 mockk 라이브러리를 이용해 모킹할 것이다
private lateinit var chain: Interceptor.Chain
private lateinit var interceptor: VinylaResponseUnboxingInterceptor

@BeforeEach
fun setUp() {
    chain = mockk(relaxed = true)
    interceptor = VinylaResponseUnboxingInterceptor()
}
그리고 chain.proceed()가 우리가 원하는 Response를 뱉어내기만 하게 만들어주면 된다.
every { chain.proceed(any()) } returns successResponse본격적인 테스트 이전에, 우리가 원하는 이 실제 서버가 주는 형식의 Response를 먼저 만들어 볼 것이다.
// given
val successRawResponseJson = """
    {
        "status": 200,
        "success": true,
        "message": "response message blar blar",
        "data": {
           "someKey": "awesome",
           "otherKey": "otherValue"
        }
    }
""".trimIndent()
val successResponseBody =
    successRawResponseJson.toResponseBody("application/json".toMediaType())
val successResponse = Response.Builder()
    .code(200)
    .body(successResponseBody)
    .request(Request.Builder().url("https://localhost:8080/").build())
    .protocol(Protocol.HTTP_1_1)
    .message("mockedMessage")
    .build()
휴... 매우 길다. 귀찮지만 Okhttp에서 제공해준 Builder로 일일이 원하는 Response 객체를 만들어 주어야 한다.
주의점
Response의 code, request... 등등... 우리가 필요한 건 body 뿐인데, 왜 이런 것 까지 세팅을 해야 하는 거지?
라고 생각할 수 있다. 그 이유는...
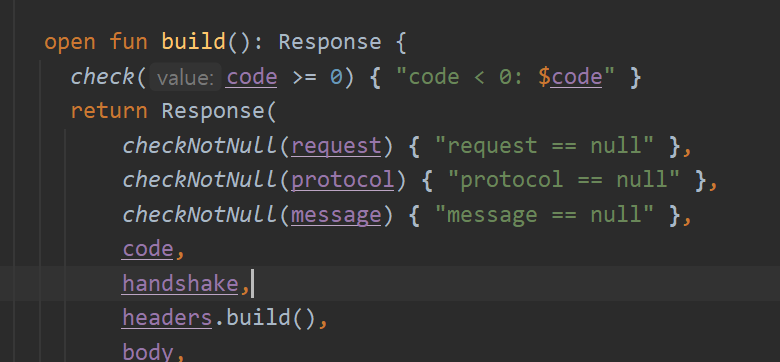
비어있으면 build() 메서드에서 터지기 때문이다... 😅😅😅😅😅 (Request 객체도 비슷하다)
null이 아니기만 하면 되니, 아무 값이나 채워 넣어도 무방하다. localhost니, message니, 필자가 마음대로 채워 넣은 것이다.
이게 끝인 줄 알았지만, 우리가 interceptor의 반환 값으로 기대하는 Response 객체도 만들어줘야 한다 😅
val expectedRawResponseJson = JSONObject(
    """
    {
       "someKey": "awesome",
       "otherKey": "otherValue"
    }
""".trimIndent()
).toString()
val expectedResponseBody =
    expectedRawResponseJson.toResponseBody("application/json".toMediaType())
위 코드에서는 json Body를 JSONObject 객체에 넣고, toString()를 했는데, 그만한 이유가 있었다.
저런 형식의 json object가 responseBody로 변형되는 과정에서 json의 모든 공백 문자가 사라진다. 그래서 interceptor 응답 값에 들어있는 json string은 공백이 모두 빠져있는 문자열이다. 그렇기 때문에 눈으로 보이기에는 공백이 들어가 있지만, 실제로 expectedRawResponseJson 안에 할당되어있는 문자열은 공백 문자가 모두 빠진 형태이다.
Test 코드는 로직의 설명서이기도 하기 때문에 보는 사람이 직관적으로 보고 파악할 수 있어야 한다고 생각한다.
아래처럼 공백 문자가 없는 Json은 읽는 사람으로 하여금 매우 불편하다.
val expectedRawResponseJson ="\"someKey\":\"awesome\",\"otherKey\":\"otherValue\"}"그렇기 때문에 사용자에게 더 익숙한 형태의 Json을 보여주기 위해서 아래처럼 구성했다.
val expectedRawResponseJson = JSONObject(
    """
    {
       "someKey": "awesome",
       "otherKey": "otherValue"
    }
""".trimIndent()
).toString()
이제 진짜 테스트!
Response 객체 만드는 게 매우 번거로웠지만 원하는 값들을 모두 세팅해두었다면 테스트 자체는 생각보다 매우 싱겁다.
 every { chain.proceed(any()) } returns successResponse

// when
val actualResponse: Response = interceptor.intercept(chain)

// then
assertAll(
    { assertThat(actualResponse.body?.string()).isEqualTo(expectedResponseBody.string()) },
    { assertThat(actualResponse.message).isEqualTo("response message blar blar") },
)
에.. 이게 끝이다 🙄🙄
interceptor로부터 가져온 actualResponse의 Json body가 내가 기대한 json body가 맞는지 비교하기만 하면 된다.
message도 할당해줬으니 이것도 비교했다.
every { chain.proceed(any()) } returns successResponse이 코드는 mockk 라이브러리를 사용하는 방법으로, 맨 처음에 chain에 mockk() 객체를 할당하는 것을 봤을 것이다.
이 mockk() 객체는 깡통이기 때문에 실제로 무언가를 반환해주지 못한다.
그렇기 때문에 mockk()에게 chain이라는 모킹한 객체에서. proceed()라는 메서드를 아무 파라미터(any)든 넣으면 successResponse를 반환하게 만들어 달라고 부탁하는 것이다.
JSONObject not mocked ERROR
Method toString in org.json.JSONObject not mocked. See http://g.co/androidstudio/not-mocked for details.
java.lang.RuntimeException: Method toString in org.json.JSONObject not mocked. See http://g.co/androidstudio/not-mocked for details.
	at org.json.JSONObject.toString(JSONObject.java)
    ...
아니 갑자기 이게 몬소리야...? mocking이 안됐다구? 😨😨😨
필자의 테스트를 쭉 복사해서 사용해보면 이런 에러가 발생할지도 모른다.
당연히 필자가 뭔가를 잘못 건드려서 생긴 문제라 생각해서, 바로 검색하지 않고 로그 찍고 삽질하고 별 짓을 다했지만... JSONObject 생성자가 계속해서 null를 반환했다. 대체 왜....???!?!?! 😨😨😨😨😨
검색을 먼저 해볼 걸 그랬다. 구글에는 나 같은 문제를 겪는 사람이 한 둘이 아니었던 것 같다.
https://stackoverflow.com/questions/29402155/android-unit-test-not-mocked
gradle에 아래 것들을 추가해주면 문제가 해결된다.
android {
  ...
  testOptions {
    unitTests.returnDefaultValues = true
  }
  ...
}
...
dependencies {
    ...
    testImplementation 'org.json:json:20180813'
    ...
}
만약 testOption만 등록하고 dependency는 설정하지 않는다면, 이번엔 NPE 메시지를 볼 수 있을 것이다 😅
글을 읽어보니 원인은 JSON은 Android SDK에 들어있기 때문에 JSONObject의 stub객체를 접근해서 그렇다는데..
왜 그런지는 솔직히 잘 모르겠다. 분명 이 모듈은 Android 의존성도 걸려있는데.. (Local Data Source인 Room 때문에 존재한다) 왜 Stub객체를 때린다는 걸까? 알 수 없는 컴퓨터의 세계...
마무리
Okhttp Interceptor에서 원하는 response만 뽑아내는 기능에 대해서 구현과 테스트하는 것 까지 다루어보았다.
이미 서버 api가 개발되어있는 상황에서 원하는 형태로 response를 다루고 싶었거나, Interceptor test를 하는 방법에 대해서 고민이 많았던 사람들, 그냥 공부하려는 사람들 모두 이 글이 도움이 되었길 바란다.
이 글이 도움이 되셨나요?
말리빈에게 커피를 한 잔 쥐어 주세요! ☕ 커피를 인풋으로 더 좋은 글을 아웃풋으로 쓰려 노력하겠습니다 😊

Interceptor 구현 전문
class VinylaResponseUnboxingInterceptor : Interceptor {
    override fun intercept(chain: Interceptor.Chain): Response {
        val response = chain.proceed(chain.request())
        val responseJson = response.extractResponseJson()

        val dataPayload = if (responseJson.has(KEY_DATA)) responseJson[KEY_DATA] else EMPTY_JSON
        return response.newBuilder()
            .message(responseJson[KEY_MESSAGE].toString())
            .body(dataPayload.toString().toResponseBody())
            .build()
    }

    private fun Response.extractResponseJson(): JSONObject {
        val jsonString = this.body?.string() ?: EMPTY_JSON
        return try {
            JSONObject(jsonString)
        } catch (exception: Exception) {
            Logger.d(
                "VinylaResponseUnboxingInterceptor",
                "서버 응답이 json이 아님 : $jsonString"
            )
            throw UnexpectedServerError(cause = exception)
        }
    }

    companion object {
        private const val EMPTY_JSON = "{}"

        private const val KEY_MESSAGE = "message"
        private const val KEY_DATA = "data"
    }
}
Interceptor Test 일부
internal class VinylaResponseUnboxingInterceptorTest { private lateinit var chain: Interceptor.Chain private lateinit var interceptor: VinylaResponseUnboxingInterceptor @BeforeEach fun setUp() { chain = mockk(relaxed = true) interceptor = VinylaResponseUnboxingInterceptor() } @Test fun `응답 성공 시 Response body를 서버 응답 Json의 data value의 내용으로 변형한다`() { // given val successRawResponseJson = """ { "status": 200, "success": true, "message": "response message blar blar", "data": { "someKey": "awesome", "otherKey": "otherValue" } } """.trimIndent() val successResponseBody = successRawResponseJson.toResponseBody("application/json".toMediaType()) val successResponse = Response.Builder() .code(200) .body(successResponseBody) .request(Request.Builder().url("https://localhost:8080/").build()) .protocol(Protocol.HTTP_1_1) .message("mockedMessage") .build() every { chain.proceed(any()) } returns successResponse val expectedRawResponseJson = JSONObject( """ { "someKey": "awesome", "otherKey": "otherValue" } """.trimIndent() ).toString() val expectedResponseBody = expectedRawResponseJson.toResponseBody("application/json".toMediaType()) // when val actualResponse: Response = interceptor.intercept(chain) // then assertAll( { assertThat(actualResponse.body?.string()).isEqualTo(expectedResponseBody.string()) }, { assertThat(actualResponse.message).isEqualTo("response message blar blar") }, ) } ... }반응형'안드로이드' 카테고리의 다른 글